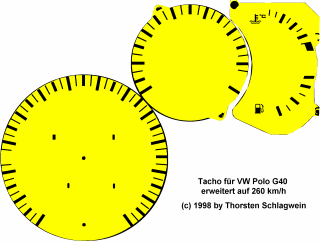
White Dials
First of all you have to remove your instruments. How to do that you find in every repair manual. Now you have to dismantle the instrument. Remove the screws on the back of the instrument and the bulbs. Now you can't take out the Tachometer and speedometer a.s.o of the unit. Now take the needles extremely cautious and put it over the small stroke (Anschlag). Very IMPORTANT: Now wait until the needle stops to commute. Mark the tachometer (Speedometer...) where the needle stops. Now take some tweezers and remove the needles EXTREMELY CAUTIOUS from its shaft. Please be very carefull. It's possible to damage the tacho /speedo..!! Now remove the strokes with pliers. Don't worry if they break you can stick it later with superglue.
When the needles are removed, you loosen the small crossscrews and now you can remove the dials. Lay the Dials on your Scanner and scan it with a resolution of about 300dpi. Use the black and white mode. Now the creative part of the work is to do. ;-) With a program like Corel Photo Paint or something else you can design your own dials. For those who don't have a scanner I've added a scan from a G40 Tacho. If your Dials are ready you have to print it. Best Material to print on is an adhesive slide for Laser Printers. I use the Colourlaser at work. ;-) If you don't have a colourlaser at hand, take glossy paper or better photopaper for your inkjet printer. Works the same but you have to use spray-glue to stick on the dials. Now you can rebuilt your Instrument. Put the needles on in the marked position. If the small strokes are broken stick them on with superglue.